5. Create the FreeRTOS static library
We are going to create a static library containing all the FreeRTOS functions. After this is finished, we will link all the applications we create to this library. A lot of this process is about organizing the files provided in FreeRTOS package, and a little of it is really about codding.
5.1. Create a new C++ Project and select AVR Cross Target Static Library / Empty Project as project type. Press next.
 |
| Creating a project. |
5.2 Deselect the Debug configuration. We don't need it as Arduino UNO board does not allow us to debug applications
 |
| We don't need Debug configuration. |
5.3. Select ATmega328p as MCU Type. Press finish.
 |
| Selection the MCU type. |
5.4. Download the file FreeRTOSV8.2.1.zip and extract it. After that, copy the folder Source into your project folder. As you can see in FreeRTOS documentation, the package contains various resources, such as example applications and guides, but all we need for now is the kernel source.
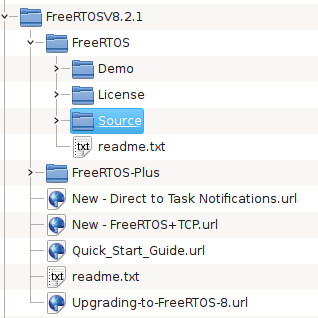 |
| FreeRTOS package contents. |
You will have a project like this:
 |
| FreeRTOS as an Eclipse project. |
5.5. Remove all the portable layer folders in Source/portable, except for GCC and MemMag (I will explain the contents of these folders later). There are portable layers for many compilers, but we are going to keep only GCC.
 |
| Deleting unnecessary portable layers. |
5.6. Remove also all the folders inside Source/portable/GCC, except for ATMega323. It is not the processor we are using (ATMega328p), but it is the most similar to it. So we are going to use as starting point.
 |
| ATMega323 portable layer. |
5.7. Rename the folder ATMega323 to ATMega328p. It is not an essential step, but it will make your project more coherent.
 |
| ATMega 328p portable layer. |
5.8. Remove all the files in Source/portable/MenMang, except for heap_2.c. As explained om FreeRTOS page, each of these files implement a different memory management model. We are going to stick with the model #2 because it enables the memory to be allocated and freed.
 |
| Memory management implementation file. |
5.9. Open the project properties and go to the section Paths and Symbols. Click on Add...
 |
| Paths and Symbols section on project properties. |
... and add Source/include to the include search path, as shown in picture below.
 |
| Adding include search path. |
5.10. But there is still one missing header file. We will copy it from one of the example applications provided in FreeRTOS package. Copy the file FreeRTOSV8.2.1/FreeRTOS/Demo/AVR_ATMega323_IAR/FreeRTOSConfig.h to Source/include.
6. Adapt source files to ATmega328p
6.1. FreeRTOSConf.h
@line 73: Replace
#include <iom323.h>
for
#include <avr/io.h>
That is the generic header file for all AVR processors. It references other header files that are selected according to some processor being used (the right symbols must be defined for that to happen).
@line 90: Replace
#define configUSE_IDLE_HOOK 1
for
#define configUSE_IDLE_HOOK 0
This parameter enables us to define a callback function to be called when the system is in idle. In practice, it is a low priority task that is execute when there is no other task to be executed. It could be used to perform some background work or putting the processor in low power state. We don't want to use it now.
6.2. portable.h
@line 94: Replace
#include "portmacro.h"
for
#include "../portable/GCC/ATMega328p/portmacro.h"
6.3. port.c
This is probably the most important file as regards to porting FreeRTOS to a new processor.
@line 96: Replace
#define portCOMPARE_MATCH_A_INTERRUPT_ENABLE ((uint8_t) 0x10)
for
#define portCOMPARE_MATCH_A_INTERRUPT_ENABLE ((uint8_t) 0x02)
@lines 434 and 436: Replace TIMSK for TIMSK1.
@lines 447, 448, 460, and 461: Replace
SIG_OUTPUT_COMPARE1A
for
TIMER1_COMPA_vect
An that is it for the FreeRTOS static library. All we need to do not is creating some applications and link them to this library.